Introduction
If you’re used to working on IT projects, you’ve probably heard of continuous integration. The latter is a working method which consists in checking each of the modifications made in the source code, so that any regressions do not appear in your application.
There are two different ways to verify and test code:
- manually: we therefore necessarily go through the reading of the code, via the merge request or pull request in order to compare the old and the new version. And, if necessary, the application is deployed locally or on a test server, with the new source code to check in full size what this change gives.
- automatically: It is quite possible to delegate certain checks or tests to a third-party system, which, with the rules that you have defined for it upstream, will execute a battery of commands, and check without you needing to lift a finger that your new code is sane. This is called continuous integration, in English continuous integration (CI). These commands will trigger on the gitlab servers, when a push is performed on the branch(es) you have defined. Thus, you will be able to control everything that passes through your repository. These commands are called pipelines.
It looks very beautiful and interesting, but… How do we do it?
This is where Gitlab CI comes in:
Initializing our project in gitlab
Creation of the project
First of all, to set up continuous integration on Gitlab, we obviously need a project versioned with GIT. In a previous article, I explained how to set up a PHP-apache-mysql application under docker. I suggest you take up this little site, on which we will initialize our CI.
I let you download it by clicking here.
Reminder: If you haven’t read this article, the goal is simply to have a ready-to-use site base, launching with Docker. To quickly launch the site:
1) Download the zip and unzip it
2) Open a terminal in this folder and run the command “$docker-compose up”
3) Once the containers are launched, go to http://localhost
Once the project is launched, go to the only PHP file of the application, and replace the content with the latter, in order to have a blank project:
<?php

echo 'Hello World';
If everything goes well, your localhost should show you this text.
Versioning of the project on Gitlab
Since the pipelines that we are going to ask to be carried out will be launched on the Gitlab servers, we must therefore version our project with GIT. Let’s just do it:
- If you haven’t already, create a Gitlab account
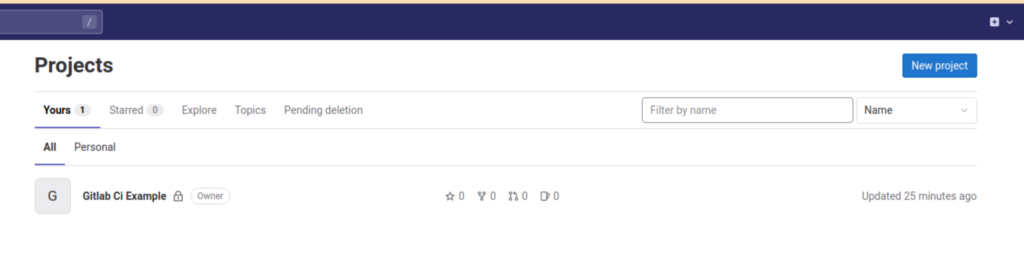
- Once done, go to the list of projects and create a new one:
- Choose the option “Create blank project”
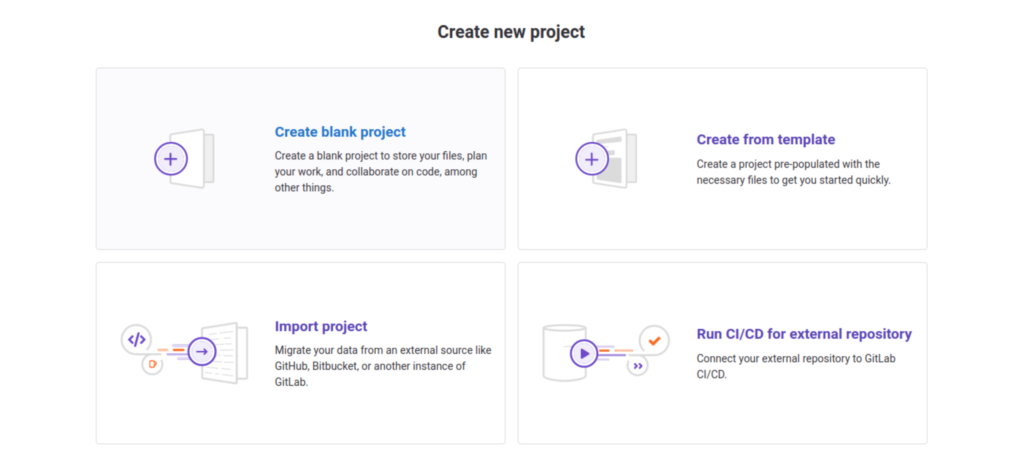
- Give it the name you want, then finalize its creation
- Run these commands on your PC
$ cd <VOTRE_DOSSIER>
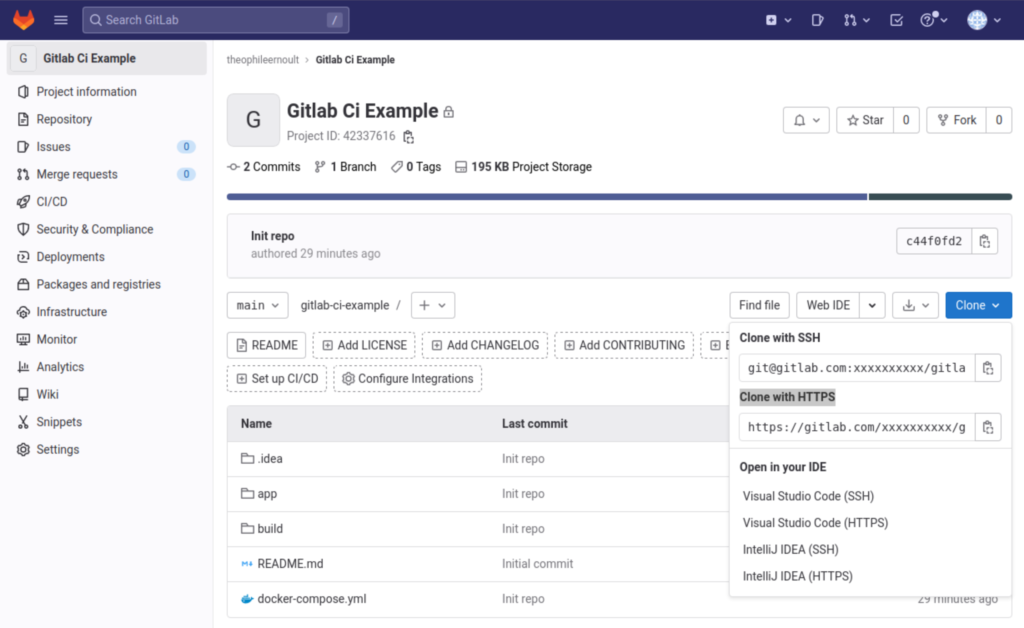
$ git clone origin <URL_DU_PROJET_.git>You will find the URL of your repository by pressing the “Clone” button, and copying the value from the “Clone with HTTPS” section:
We cloned the project locally, but it is empty. Unzip the items you downloaded into this folder, then run these commands:
$ git add .
$ git commit -m 'Init repo'
$ git push -origin main
Once all this is done, you should, as in the previous screenshot, find yourself with the complete project, versioned on Gitlab. We will be able to start getting to the heart of the matter, ie to start continuous integration!
Implementation of continuous integration
.gitlab-ci.yml
Now that everything is ready, we can start. First of all, any rule that needs to be put in place will be through a file that you will need to place at the root of your repository and which will be called “.gitlab-ci.yml”. I suggest you create it right away, using one of the most basic templates, offered by Gitlab:
stages:          # List of stages for jobs, and their order of execution
  - test

unit-test-job:   # This job runs in the test stage.
  stage: test
  script:
    - echo "Running unit tests... This will take about 60 seconds."
    - sleep 60
    - echo "Code coverage is 90%"

lint-test-job:   # This job also runs in the test stage.
  stage: test    # It can run at the same time as unit-test-job (in parallel).
  script:
    - echo "Linting code... This will take about 10 seconds."
    - sleep 10
    - echo "No lint issues found."
What does this file contain?
- We define 1 step that will run on each push, which we call “test”
- For this test step, we define 2 jobs, “unit-test-job” and “lint-test-job”, which will execute the commands defined inside.
That’s it, for the moment it’s not very rocket science is it? Version everything and send the file to Gitlab:
$ git commit -am 'Add gitlab CI'
$ git push origin main
Pipelines
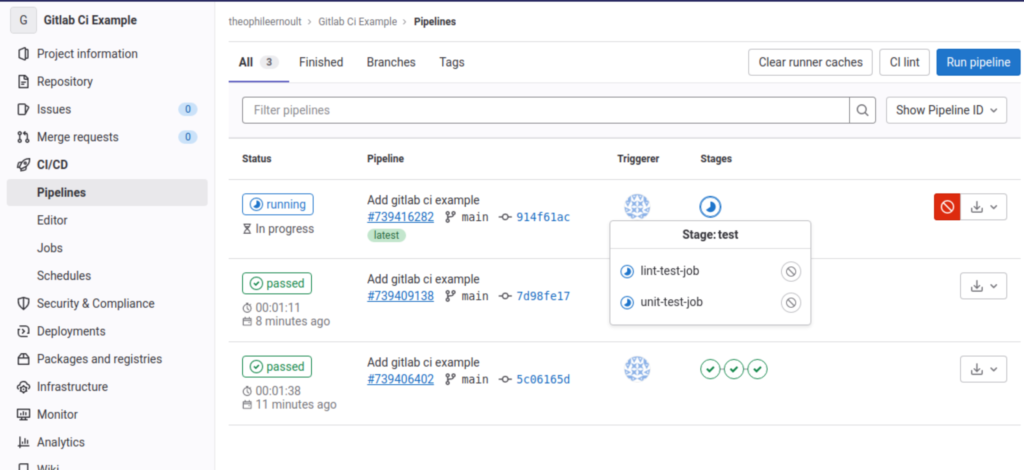
Go to Gitlab in the CI/CD > Pipelines section, and you will see an entry corresponding to your newly committed file:
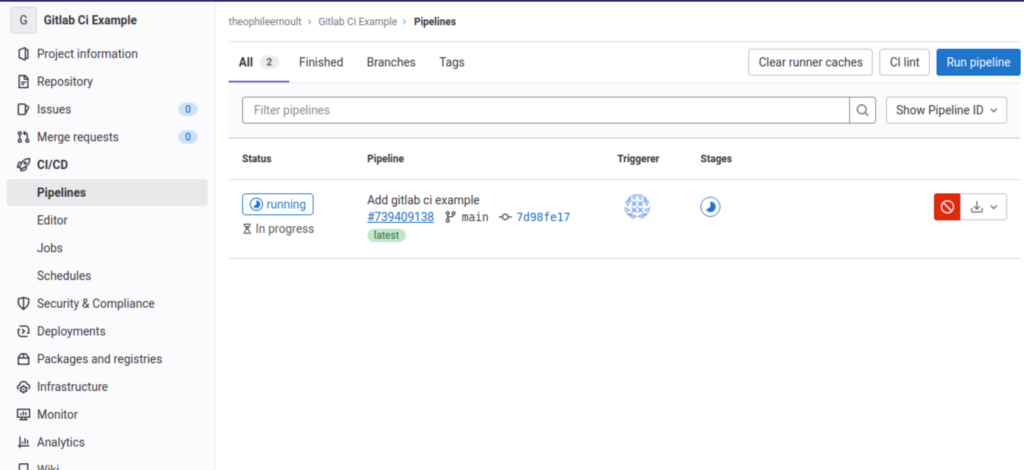
Your pipeline is underway. It can have one of three statuses:
- Running : the jobs are starting and are not yet finished
- Passed : All the jobs are done
- Failed : An error occurred during one or more jobs, and you can see the logs by clicking on the status
If we enter the pipeline by clicking on the round icon indicating that it is in progress, we can verify that two jobs are running, and they correspond to those that we have defined:
Let’s click on the first one, for example, and let’s see what’s going on inside:
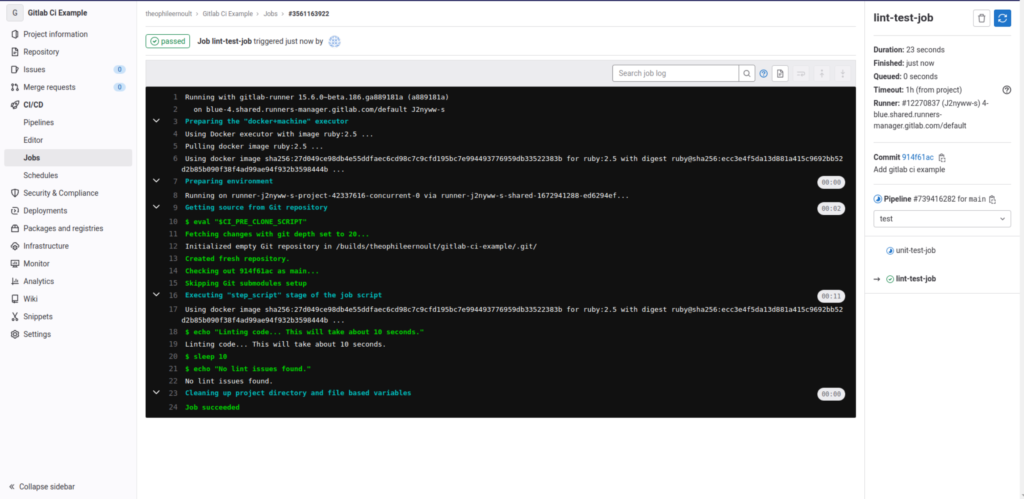
What is happening here ? Gitlab retrieves the commands you wrote in your .gitlab.ci corresponding to this job, and will execute them, one by one, on its servers. What happens in the terminal inside the runner running your script is broadcast in real time, as if you were playing them yourself. Thus, for this job, we can find our commands, and their results as they are launched:
$ echo "Linting code... This will take about 10 seconds."
Linting code... This will take about 10 seconds.
$ sleep 10
$ echo "No lint issues found."
No lint issues found.
If errors had occurred, then they would be written, just like the successes.
Now that we’ve seen that, let’s go back to the list of pipelines:
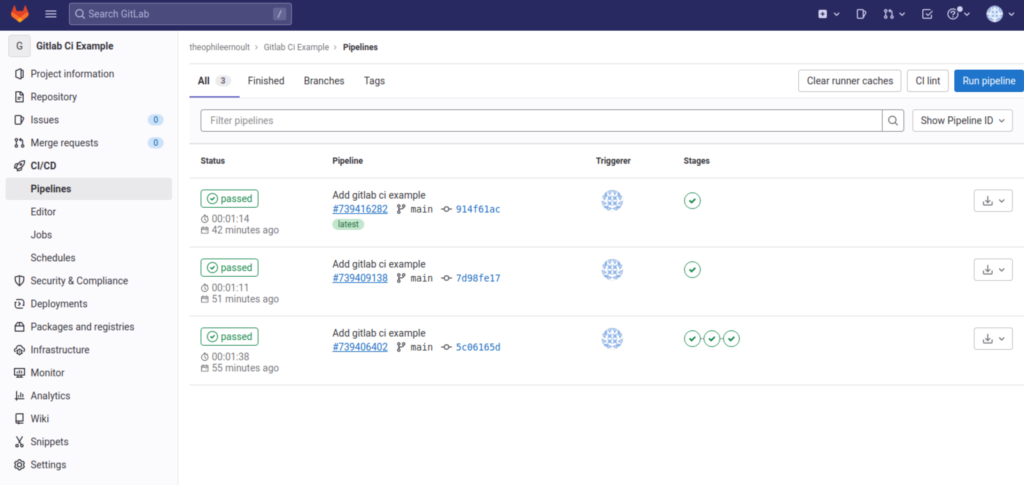
You can see that on my side, I have several lines present. Indeed, with each new commit, the pipeline is launched. We can also see that ours (the very first) ended well, and that both jobs were successful.
Your pipeline is therefore installed and ready to use.
Usefulness and use cases
Well, it’s nice to have a pipeline with a green icon and a “Passed” status, but it doesn’t change our lives for the moment. What is it going to be able to serve us concretely?
Security and regression avoidance
The first interest of having installed a continuous integration is to secure your application. Indeed, imagine that you are on a project where ten or even a hundred people work on a daily basis. Everyone has their coding habits, and makes mistakes. A human eye can detect it when reading a merge/pull request, but oversight or inattention can happen quickly, and stuff that shouldn’t be in your target branch may slip in. This problem is answered by continuous integration, which will monitor each of the rules you have defined, and return an error code if necessary.
For now, the rules we have defined are useless, and were simply lo to test the launch of the pipelines. But let’s imagine we put this in place:
stages:          # List of stages for jobs, and their order of execution
  - test

unit-test-job:   # This job runs in the test stage.
  stage: test    # It only starts when the job in the build stage completes successfully.
  script:
    - echo "Running unit tests... This will take about 60 seconds."
    - sleep 60
    - echo "Code coverage is 90%"

lint-test-job:   # This job also runs in the test stage.
  stage: test    # It can run at the same time as unit-test-job (in parallel).
  script:
    - echo "Linting code..."
    - FIRST=$(head --bytes 5 app/index.php)
    - if [[ $FIRST == "<?php" ]]; then exit 0; else exit 1; fi
We stipulate here that in the lint job, we will check that the first 5 characters of the “app/index.php” file are indeed “<?php”. Indeed, if a PHP file does not start with this tag, your application will not work.
I will therefore voluntarily modify the index.php like this:
echo 'Hello World';

echo 'I have removed the PHP tag so the file will never work :/';
I put this piece of code on a new branch which will be called “failure”. And I push my code, so that the pieline launches on Gitlab.
And no surprise…
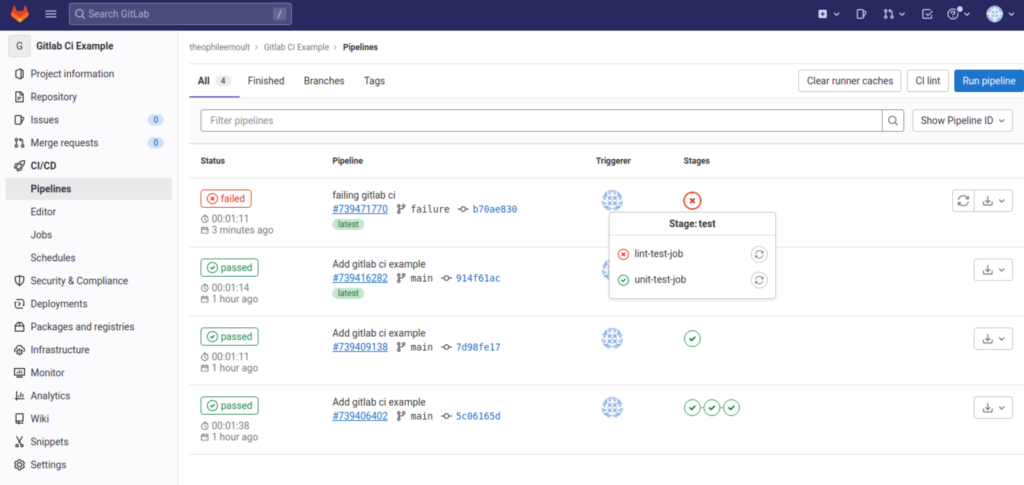
It ended in failure.
I was talking about security a little earlier, let’s take a look in the Settings > Merge request section of Gitlab, and especially in the Merge checks section.
You will find a particularly interesting option there, which we will immediately check. It’s called “Pipelines must succeed”
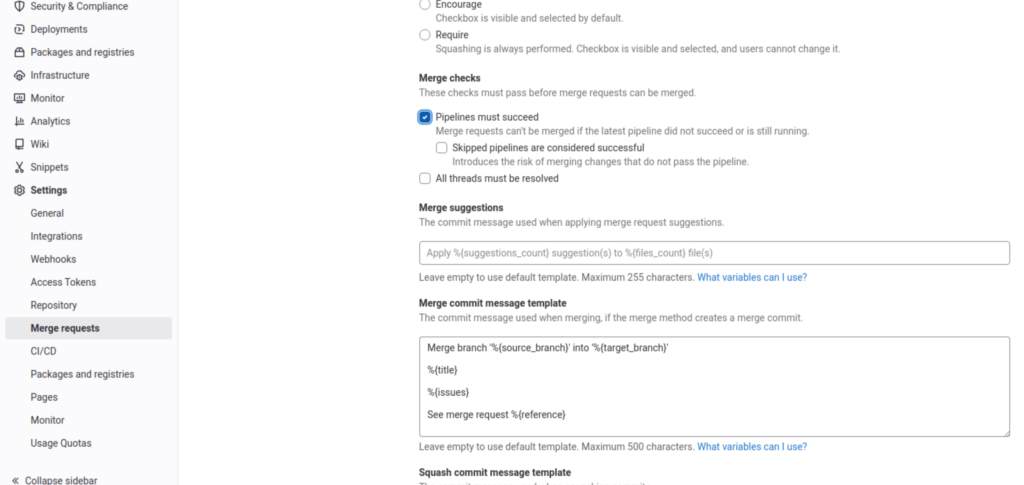
This option, once activated, will not allow you to accept a merge/pull request when the associated pipeline has not passed. This GUARANTEES that the code that will be merged will respect the rules defined in your .gitlab.ci
And, indeed, if we go back to our failure branch, and attempt to open a merge request to the main branch…
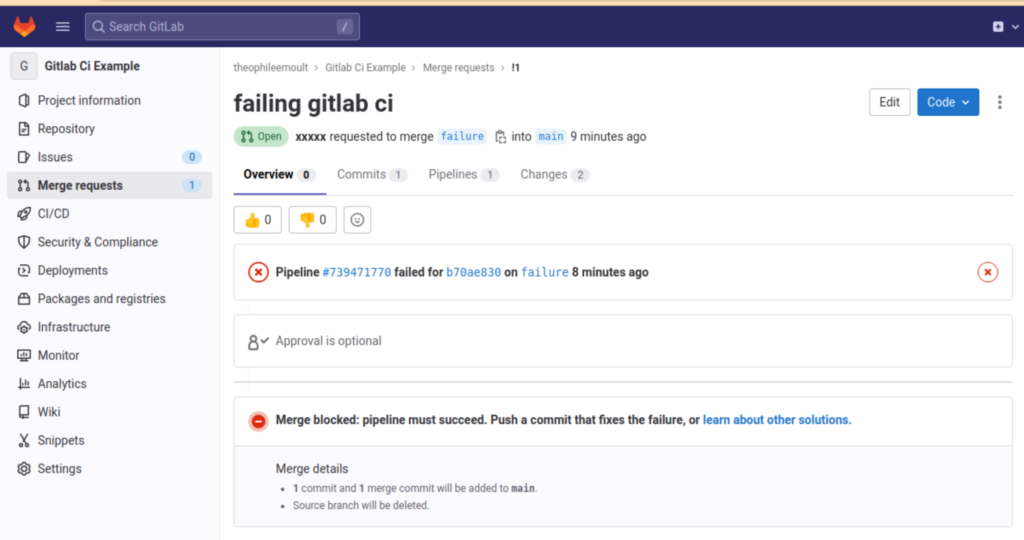
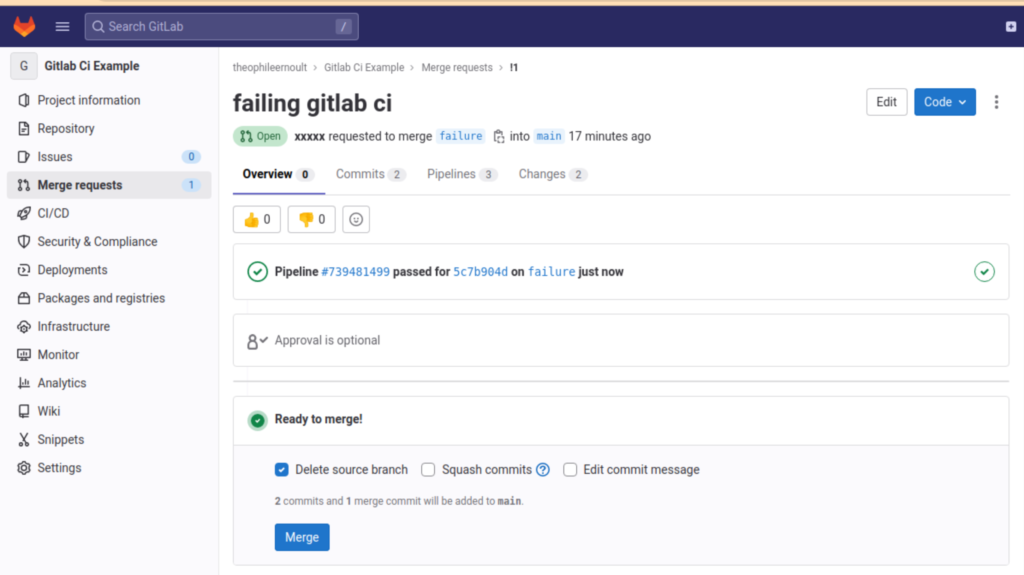
The merge is impossible, until we push a new commit, which will put the pipeline back into a successful state. We will therefore put our missing tag back on our code and create a new commit:
<?php

echo 'Hello World';

echo 'better :)';
The pipeline is now fixed, and merging is possible again:
Go further
We have seen how to set up a simple continuous integration file, for a very basic use case. In reality, when reviewing a piece of code, it is almost impossible to miss a mistake as big as a “<?php” tag that has disappeared, especially since a simple glance at the page in question allows you to see that something is not normal.
Nevertheless, this article gives you the basics to trigger automated scripts during each of your commits. The limit of use is limited only to your imagination. Some of the most common tests and jobs include:
- Code lint with dedicated tools (PHPStan, PHPcs, ESLint for javascript…)
- Automated tests with PHPUnit, allowing you to write real scenarios for more or less complex sites, with management of your databases etc…
- Continuous deployment of your branches (CD) on a dedicated server
- Launching a specific pipeline for a specific branch/tag
- Any command you do in bash can be inserted there
- …
I strongly urge you to read the official Gitlab documentation to learn more about it, and until then, good code!