Introduction
If you are a PHP developer, you may still develop your web applications with Apache installed on your computer. If one day your production changes version of PHP, or even e MySQL, you are therefore obliged to follow by updating yourself, potentially encountering compatibility problems etc. Now imagine that you decide to add Redis caching to your application, or even a second API to be hosted on another server, or even a full-fledged mail server? You’ll be forced at each iteration to install a new server, to connect it to Apache, to stuff yourself with configuration files with the shovel. An example which is also very common, is “How to make so that developers being on MAC, Linux and Windows can work on the same version, without having different configurations”?
Just thinking about it will make you wrack your brains. But luckily, Docker and Docker-compose are here to help. They will allow you, using their container system, to achieve all this in record time. (If you do not know the principle, I authorize you to temporarily leave this article to find out about it, and install them at the same time).
We can nevertheless think that the configuration of Docker requires a good level of understanding of information systems, and knowing how to dig through a huge documentation to succeed in having something functional, so spending time there. It is not so. We will see that to configure a simple website (PHP-Apache-Mysql), we need a total of 5 minutes (yes, we promise!)
Application Architecture
For this tutorial, we will create a single web page, which will query a database, and display the data of a table. The site is deliberately very succinct, in order to focus on the simplicity of action of Docker.
For this, I propose the tree and the following files:
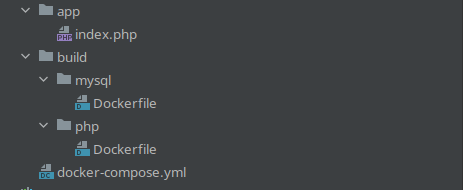
With only these 5 files, we will be able to build an apache server containing PHP, a MySQL server, and to communicate the two to use our website.
These 5 files will have the following role:
- app/index.php: The entry point of our website, we will write our PHP code there
- build/mysql/Dockerfile: Docker configuration file that describes how to install MySQL
- build/php/Dockerfile: Docker configuration file that describes how to install Apache and PHP
- docker-compose.yml: Docker-compose configuration file, which when executed will launch the containers and run our architecture.
Writing Docker configuration
As you will have understood, all the configuration will be done within the 3 files concerning Docker. We will have two containers: One for PHP and Apache, and another for MySQL. Let’s see how to proceed:
docker-compose.yml
version: "3.9"
services:
  php-apache:
    ports:
      - "80:80"
    build: './build/php'
    volumes:
      - ./app:/var/www/html
  mysql:
    ports:
      - "3306:3306"
    build: './build/mysql'
    environment:
      MYSQL_ROOT_PASSWORD: "super-secret-password"
      MYSQL_DATABASE: "my-wonderful-website"
    volumes:
      - dbData:/var/lib/mysql
volumes:
  app:
  dbData:
This is what our docker-compose.yml will look like, and it won’t move. There isn’t much, is there? Let’s break down its content anyway:
We find two services, which represent our two containers:
- php-apache, will be accessible from port 80 of our machine which is the default HTTP port. The site will therefore be directly accessible from localhost. It declares that all your code, available in the “app” folder, will then be mapped to the root of the apache server, which is “/var/www/html”. Finally, the build part will define the Apache and PHP installation process, which will be in the Dockerfile of the “build/php” directory, which we will detail just after.
- mysql, will be accessible from port 3306 of our machine which is the default port of MySQL. The site will therefore be directly accessible from localhost. The build part will define the MySQL installation process, which will be in the Dockerfile of the build/mysql directory. Two variables are declared and will be executed during the installation of MySQL. MYSQL_ROOT_PASSWORD sets the root account password, MYSQL_DATABASE the default database. It will be created if it does not exist when the container is launched. A volume is also created in order to make the data persistent, and thus not to lose the database data once the container is shut down.
Writing Dockerfiles
This established, we now need to write the two Dockerfiles, which will detail the installation procedures for the two servers. Are you ready ? Watch out, it’s going to be quick:
Dockerfile Apache-PHP
FROM php:8.1-apache

RUN apt-get update && \
    docker-php-ext-install mysqli pdo pdo_mysql
What are we doing here?
We will simply tell Docker to fetch the existing php-apache image, which therefore contains apache and PHP at version 8.1.
Finally, we install the MySqli, PDO and PDO_MySQL extensions in PHP, which will be very useful for us to connect to our database.
Dockerfile Mysql
FROM mysql:latest
USER root
RUN chmod 755 /var/lib/mysql
Here the same operation, we ask Docker to retrieve the latest version of MySQL from the existing image. Then, we make a change of rights on the “/var/lib/mysql” directory of the container that will be created, in order to allow PHP to connect to it.
The configuration is now finished (and yes, already!). We can still, before launching the build, add a simple index.php file in the “app” folder, just to check that everything works well. Without originality, I suggest this one:
<?php

echo 'Hello world!';
Site building and testing
Now that all our files are present, we just have to launch the containers, and test the result. To do this, go to the root of the site, and simply run the command:
$ docker-compose upThe build will then launch, download the desired images and execute the specified commands:
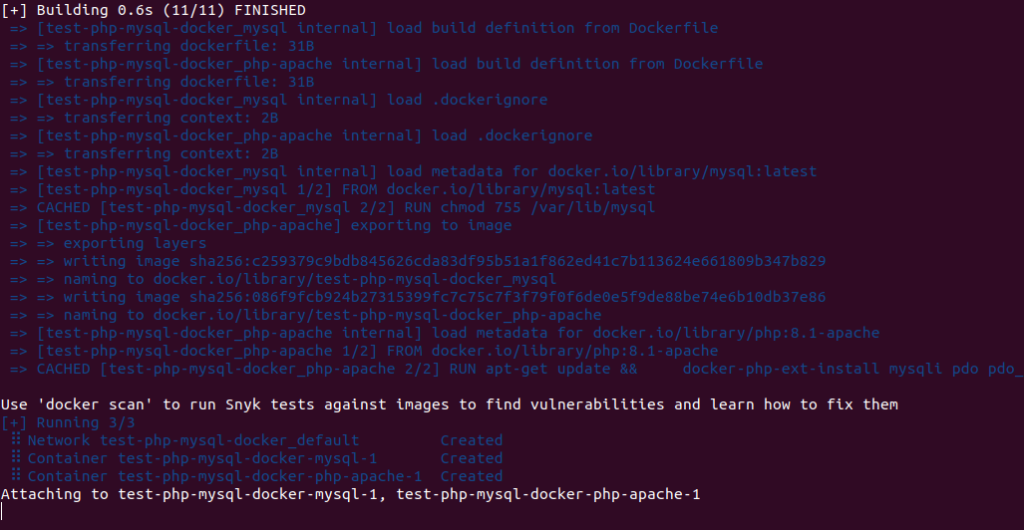
Wait a few minutes for the images to download, and once done, you should see the Apache and MySQL configuration logs appear:
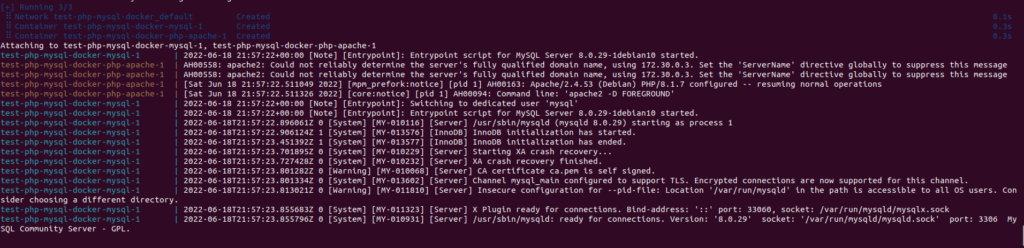
This is a sign that the installation of the containers is finalized. If you open your browser and go to http://localhost, then you will see the contents of your index.php displayed:
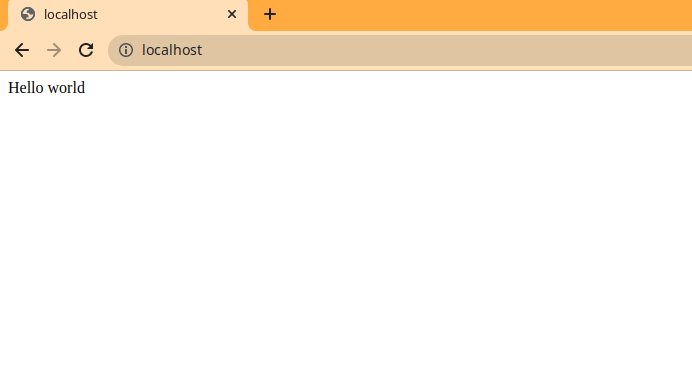
PHP-MySQL connection test
So we have confirmation that Apache and PHP are active. The first container therefore does the job well. We will therefore now, to go around the subject, check that the MySQL container is indeed active, and that the first can connect to it.
We are going to do this by connecting to MySQL from our terminal, to insert some data into a table that we are going to create, then try to display this same data from our index.php.
You need the name of your MySQL container to get started. Nothing could be simpler: Execute the command
$ docker ps --format '{{.Names}}'in a terminal. Copy the output that mentions the word “mysql”. Then, we will perform this sequence of commands to initialize our dataset:
# Connection to the MySQL container
docker exec -ti test-php-mysql-docker-mysql-1 bash

# Connect to MySQL server
mysql -uroot -psuper-secret-password
# We go to the database created when the container is launched
use my-wonderful-website;
# Creation of a "Persons" Table, with a few columns
CREATE TABLE Persons (PersonID int, LastName varchar(255), FirstName varchar(255), Address varchar(255), City varchar(255));
# Insert some data into this table
INSERT INTO Persons VALUES (1, 'John', 'Doe', '51 Birchpond St.', 'New York');
INSERT INTO Persons VALUES (2, 'Jack', 'Smith', '24 Stuck St.', 'Los Angeles');
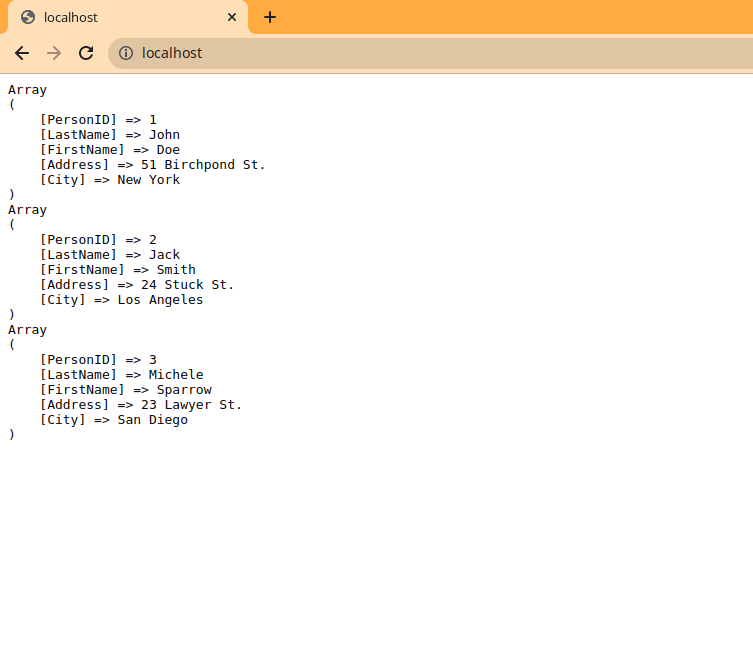
INSERT INTO Persons VALUES (3, 'Michele', 'Sparrow', '23 Lawyer St.', 'San Diego');These few data now saved in the database, we just have to try to display them from our Apache server. So let’s modify the content of our index.php accordingly in order to do this:
<?php

$host = "mysql"; // Le host est le nom du service, présent dans le docker-compose.yml
$dbname = "my-wonderful-website";
$charset = "utf8";
$port = "3306";

try {
    $pdo = new PDO(
        dsn: "mysql:host=$host;dbname=$dbname;charset=$charset;port=$port",
        username: "root",
        password: "super-secret-password",
    );

    $persons = $pdo->query("SELECT * FROM Persons");

    echo '<pre>';
    foreach ($persons->fetchAll(PDO::FETCH_ASSOC) as $person) {
        print_r($person);
    }
    echo '</pre>';

} catch (PDOException $e) {
    throw new PDOException(
        message: $e->getMessage(),
        code: (int)$e->getCode()
    );
}
Direction our browser…. and BINGO!
Conclusion
We have therefore seen that setting up a WEB server, as well as a MySQL server with Docker, is surprisingly simple. It should be noted that you can declare as many services as there are in your docker-compose, the limit being only your imagination. So I hope I have convinced you to uninstall your local configuration and migrate to Docker without further delay!
If you want to download this small project in full, it is available here in ZIP format. Extract it, open a folder in this terminal, and your server is ready!
You want to learn how to debug PHP like a pro? Read the dedicated article!
New to Docker and this article is straight to the point and it actually works.
Came across dozens of articles/tutorials on yt trying to find a setup with composer that sets you up with the basics for a PHP development environment.
Seems that app integration with Docker is still not hugely popular in the mainstream coding hustle 🙂
This is a really good tip especially to those new to the
Dockersphere. Simple but very precise info…
Many thanks for sharing this one. A must read article!
Ps: thx for the zip file it helps a lot ^~^
Oh my….
Actually worked, first time. I came looking for this as xampp and saving into /opt was driving me crazy with constant requests for sudo credentials, no good when you’re learning and want to make a change every ten seconds, and also want to use VS Code.
I’m glad I did Docker’s introductory tutorial first because it meant I could more-or-less understand everything that was going on and reference the manual as well. Thanks authors, this is really really good.
I’m really happy to read this, thank you for your feedback dude 🙂
Just like to let you know, I used the info in this site to locally develop a website for my University course, helped me enormously and I’ve put you guys in the credits 🙂
Really appreciated, many thanks mate.
Hey, this was great. Straight to the point and easy to understand. One question: If I wanted to connect the mysql database to phpmyadmin where I can just import my SQL files, how would I go about doing it?
Thank you
Hello, thank you for your comment, and glad the article was helpful to you!
In fact, I have written a dedicated article for installing Phpyadmin on docker-compose, using mysql.
I redirect you to https://doc4dev.com/en/install-phpmyadmin-for-mysql-under-docker-with-docker-compose/.
Do not hesitate if any question.
I have been have been troubleshooting bug connecting to mysql in docker until i came across your article. Thank you so much.
So glad it was helpful to you 🙂
Thank you for the positive feedback!
Hi!!
I have a problem when I run the comand “docker-compose up”.
The error is:
Can´t fin a suitable configuration file in this directory or any parent. Are you in the rigth directoy?
Supported filenames: docker-compose.yml, docker-compose.yaml
I need help you, please
Probably you are not firing the command in the right directory?
The command has to be launched in the exact same place where the docker-compose.yaml is.
Also, do not rename it, or if you do, execute instead: “docker-compose -f MY_CUSTOM_NAME.yml up”
If you still have issues, do not hesitate to answer here, I’ll be happy to help 🙂
Thank you Travis!!!!!
yes it worked!!
Right now u r hardcoding the db credentials in the php code. What if you’ve something like this in the code
$db_config = parse_ini_file(“database.ini”);
Then u can put your dsn, username, password like $db_config[‘host’], $db_config[‘username’], etc.
But where do you put this database.ini? U don’t expose the file under /var/www/html
So can you put it somewhere else and hide it so it won’t get import to /var/www/html? Not sure how u do it in docker compose or dockerfile? Thanks.
Yes, you are right about this.
In fact, because the environment variables are defined inside the docker-compose.yml, it can be simplified as :
$host = "mysql";

$dbname = getenv('MYSQL_DATABASE');

$pass = getenv('MYSQL_ROOT_PASSWORD');

$charset = "utf8";

$port = "3306";
Then up to you to define the variables you want inside your docker-compose.yml file (or in a separated .env, that will be read by default if you put it inside root directory [ie. same directory as dockr-compose.yml])
Do not hesitate if you want to have a live exemple, I can modify the article this way 🙂
I have worked with several tutorials and built many images but this is the first time it actually worked. Thank you so much for this guide.
Glad it was useful for you 🙂
I am stuck as it can’t find index.php
http://localhost:8010/
Forbidden
You don’t have permission to access this resource.
“AH01276: Cannot serve directory /var/www/html/: No matching DirectoryIndex (index.php,index.html) found, and server-generated directory index forbidden by Options directive”
It was not created as checked with command
docker exec -it 3680004a5c2a ls -la /var/www/html
total 8
drwxr-xr-x 2 root root 4096 Oct 22 06:35 .
drwxr-xr-x 1 root root 4096 Oct 12 03:36 ..
the only difference i did from the tutorial is the ports in the docker-compose.yml as I have the default in use already.
ports:
– “8010:80”
ports:
– “3316:3306”